Thursday 31 October 2013

Merry Hallowe'en - a spooky accordion card using Sizzix' Ornament Dies

An extra special spooky card today especially for Hallowe'en using lots of my favourite Tim Holtz' stash and techniques

 
"Hallowe'en Accordion Card

I'll be sharing a load of Christmas cards in a similar style next week with a full tutorial next Tuesday for anyone interested in having a go at making one.

 
"Ha"

This image reminds me so much of our cat "Lucky" (short for Lucifer of course lol!). He hides behind bushes and jumps out at us as if to say "Ha, got you!".

 " 'llo"

Funny how people say " 'llo" rather than "hello". Did you notice the first two panels read "Hallo"? People used to say "hallo" when I was little, but you hardly ever hear it these days.
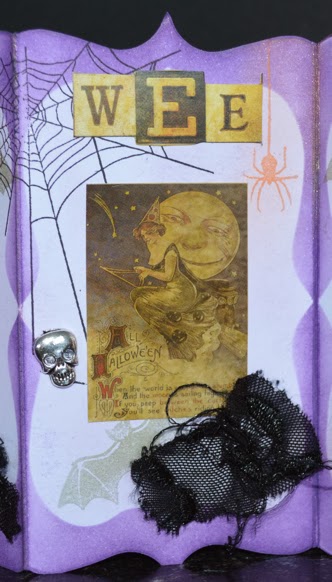
 
"Weeeeee"

If I was riding a broomstick, I'd be shouting "weeee" too (or "help"!).
 
"Boo"

I left some space on the other side to write a greeting to the (un)lucky recipient.

A few quick notes on the decoration - I used milled lavender and dusty concord distress inks with diecut panels as masks to create the inky frames. Overstamping was done with versamark and green & orange perfect pearls, and also with black archival ink. The charms are fixed with pinflair and pieces of black lace are torn apart and stuck in place with smudges of pva glue (perhaps some lady was ravaged...who knows!). The patterned papers are from Tim Holtz' Seasonal paper stash, the stickers from Tim Holtz' seasonal sticker book, and the dies used are Tim Holtz Sizzix Bigz Movers & Shapers Ornament & Mini-Ornament. Gotta love the Tim Holtz Hallowe'en stamps from Stampers Anonymous!

Normal service will be resumed tomorrow with more Christmas cards. In particular, please join me on Sunday for an extra special card to mark the start of our new challenge at Stamping Sensations, and next Tuesday for a tutorial on making accordion cards. In the meantime, watch out for the ghosts and the things that go bump in the night :-) Maddy x

Entered for the following challenges:
Simon Says Stamp - Anything Goes
Simon Says Stamp Monday Challenge - Anything Goes
Loves Rubber Stamps - Hallowe'en
Oldie But A Goodie - Charmin' (old stash was my Tim Holtz' seasonal paper and stickers)
Ribbon Carousel - Fall and Hallowe'en
Try it on Tuesdays - Hallowe'en
Country View Challenges - Hallowe'en
Emergency Crafters - Hallowe'en
Lady Bug Crafts - Hallowe'en
Bunny Zoe's crafts - Anything Goes with Ribbon
Stamp and Create - Hallowe'en
Pile it on - Embellishment Crazy
Red Carpet Studios - Hocus Pocus
That Craft Place - Hallowe'en
Totally Gorjuss - Spooky
A Creative Romance - Add Metal
Stampin for the Weekend - Something Spooky

Wednesday 30 October 2013

Ornaments

These are cards I made using some great stash I won from the US a couple of years ago.
 

There was a mix of papers, toppers and embellishments, all with vintage colours so right up my street (enough with the idioms I hear you cry :-)
 

All I added was ribbon and gems...
 

...and a bit of glue :-)


Please come back tomorrow for a break from the Christmas cards and an extra-special spoooky card for Hallowe'en. mwahahahahah *evil cackly laugh* :-) Maddy x

Tuesday 29 October 2013

Shaker Holographic Reindeer

Shaker cards and reindeer are two of my favourite things, so what better than a shaker reindeer card?


I had been diecutting Spellbinders reindeer one day, when I thought this bit of left-over card would make a great frame for a shaker card. I added some acetate and a ring of foam tape, filled it with "sparkles" (seed beads, sequins, etc.), and Bob's your uncle! Well, not really. Bob isn't really my uncle, it's just another one of those expressions. Don't know where that one's from though, guess you could go look it up on Wikipedia. Somebody has probably written it up. Wait, I'll go and look...
looking it up... oh yes here it is lol! http://en.wikipedia.org/wiki/Bob%27s_your_uncle Have a good day everyone. Maddy x

Monday 28 October 2013

Remember the shaving foam?...

Do you remember the shaving foam backgrounds we made a couple of months ago? Well, here's what I did with one of them...


A friend on Docrafts sent me a few of these diecuts, and I thought this silver sparkly one would go perfectly with the image of the ice-skater (another magazine freebie). The colouring is done with picket fence distress marker and promarkers. A great secret of the shaving foam printing technique is that it leaves the cardstock beautifully coated for colouring (well, it was my secret until I let the cat out of the bag!). Just had a thought, I have a lot of European readers on my blog (hello!). I want you to know that I do not under any circumstances condone keeping cats in bags. And I'm not going to go into the origins of the expression, which have to do with corporal punishment on board the old sailing ships, that'll just confuse things even more :-))

Anyway, I digress. There'll be a few more cards with shaving foam backgrounds along this Christmas journey. I hope you've all survived the storm in England. Maddy x

Sunday 27 October 2013

Inky Goodness

Well, if you hang around with me on this blog long enough, there will always be some inky goodness coming along sooner or later, and here it is :-)

"Inky Goodness"

As you all know by know, I love reindeer, and I fell in love with this stamp from IndigoBlu the first time I saw it. The background is sponged with seasonal distress inks before splattering with water to get that raindrop effect. The deer are stamped in black archival and heat-embossed with Stampendous detail holographic powder. The panel is matted onto silver holographic card, a tree brad is attached, then the whole thing is fixed to the front of a red card blank. I had half a dozen of these tree brads so I made 6 similar cards for the hospice box.

The first big storm of the Winter is forecast for tonight and tomorrow. At the moment it looks like it will miss us but hit the South of England badly. At the time of "The Great Storm" (15th-16th October 1987), Tom and I were students living in Fulham. I'll never forget walking to College that day (none of the tubes were running) and passing a line of very posh cars on the Old Brompton Road. Every one had been hit by a falling tree except for the very last - a beaten up old mini. That's karma for you! Stay safe everyone.

Entered for the following challenges:
A Creative Romance - Metal Mania
Crafts Too - Christmas Festivities Twist #2 what Christmas means to you (reindeer of course! :-)
Fab 'n' Funky Challenges - Distressing
Little Red Wagon - Brads or Eyelets

Saturday 26 October 2013

Nordic Bird

Here's another Christmas Bird. This one uses a crown and wing from Tim Holtz' "Heart Wings" Sizzix die cut from holographic card.

"Nordic Bird"

The patterned paper came free with a magazine last year. I think it has quite a Scandinavian feel to it.

Entered for the following challenge:
Craftyhands - Anything Goes
Craft Room Challenge - Our Feathered friends
Bunny Zoe's Crafts - Ribbon

Friday 25 October 2013

The Kindness of Strangers

A lovely lady in our local Post Office (I won't embarrass her by naming her) gave me a huge bag of cardmaking goodies that she was clearing out. There were some Christmas patterned papers and toppers and I have no idea where they came from but I've done my best to turn them into cards. I expect someone will recognise them; if you do, please let me know so I can put the name in the title!

 
"Birdhouse"

Unfortunately, out of the whole batch of cards I made, this is the only one I actually like! Isn't that little robin cute?


It can be very difficult to make cards with stuff that isn't really your cup of tea.


But I thought I'd share the other cards with you...


... just so that you see I can make some truly dreadful cards lol!


I particularly hate yellow. If I find any more yellow Christmas stash, it's going in the swap pile! Pity the poor sod that gets lumbered with these at the Hospice Craft Fair :-)

Entered for the following challenge:
Crafty Little Fairies - Anything Goes

Thursday 24 October 2013

Rudolph

Regular readers of my blog will know that one of my favourite images is a reindeer. I use them all year round, but they come into their own for Christmas cards.

"Rudolph"

This "Rudolph" stamp was part of a set that came free with "Simply Cards and Papercraft" last year, and has become one of my favourite stamp sets.  I stamped the reindeer in coffee archival ink onto watercolour paper and coloured him with distress inks, adding some sponged Tumbled glass in the background to resemble clouds and a red gem for a nose. The Poinsettia is made up from a Papermania petal pouch set. I shaped each leaf and petal with an embossing tool, layered with Pinflair, and added some gold seed beads to the centre.

Entered for the following challenge:
Rhedd and Rosies - Anything Goes

Wednesday 23 October 2013

Christmas Tree Toppers

Hello again! Today I'm sharing a couple more cards made with Martha's toppers. These have Christmas trees.


The colours aren't the best of matches (that'll teach me for crafting in the dark lol!), but I like the trees in the background.


This one works better I think. Well that's the last of the topper cards. Something a little different tomorrow... :-)

Entered for the following challenge:
Allsorts - Treemendous

Tuesday 22 October 2013

Snowman Toppers

My mil (hi Martha!) gave me a couple of sheets of Christmas toppers to help with the hospice cards, and I just used them in place of the rub-ons in the same design. I hope I'm inspiring you to use up some of that old stash :-)


 The holographic embossing on the "A Joyful Christmas" sentiment reflects the flash of the camera somewhat and makes it a bit hard to see, but we have been suffering with torrential rain which has made it hard to take decent photos so please forgive :-)


You'll notice I'm still using up the smaller rub-ons from the sheet (snowmen in the top left are waving to say hello).


These two have snowflake stickers (I really am dredging in the dregs of my stash :-)


Please join me again tomorrow. I've managed a week of Christmas cards so far, and am hoping to blog more every day until Christmas! Maddy x

Monday 21 October 2013

Quick Cards using the free gift from November's "Cardmaking & Papercraft"

I loved the blue and silver colour scheme of the free gift from November's "Cardmaking & Papercraft" as you can see by the pile of cards I made for the hospice...


I have to apologise that the colours look a bit washed out. I took these photographs last Friday and the weather was "dreagh" as they say around here, so had to use the flash on the camera :-)

Sunday 20 October 2013

Candles

A couple of years ago I learned this fab trick from Tim Holtz' blog. You take a picture of a candle and cover the candle with glossy accents. Once dry, it looks like real wax.


This image was sent to me by a friend on Docrafts and I coloured it using distress markers before using the glossy accents trick.


From this angle, you can see the waxy shine on the candle.

Saturday 19 October 2013

More of those Christmas cards with snowmen rub-ons

Today's quick cards are similar to yesterday's, but use a slightly different design of stamping with snowflakes.


"Noel"

The snowflakes are made to sparkle by heat-embossing with a holographic powder.


"Warm Wishes"

Don't worry, Mr. Snowman isn't lonely - can you see his friends waving in the background?

Entered for the following challenge:
Creative inspirations paint - anything goes
Creative Craft Challenges - Anything Goes

Friday 18 October 2013

Christmas cards using Rub-ons

Today's Christmas cards for the hospice feature patterned paper, stamping and rub-ons. I've used more of the patterned paper from last year's magazines. The overstamping uses Tim Holtz' stamps with black archival ink. Some of the stamping is also heat-embossed in Stampendous Kaleidoscope Transparent, which is a clear embossing pwder that gives a lovely, holographic effect.

"Snowmen Rub-Ons"

The snowmen rub-ons were a gift from a friend, so I've no idea where they came from. Rub-ons work quite well on patterned papers that might be hard to colour.

 
"Happy Christmas"

Each of these cards has a sentiment or ticket cut from patterned papers and fixed at one end with a brad so it sits at a jaunty angle.

 
"I Love Snow"

The arrangement for the background stamping is one of my favourites this year and you will see it again over the coming weeks. I'm intending to try and post some of these quick cards every day until Christmas, interspersed with some of my more elaborate cards from time to time, and I hope you can join me again. Maddy x

Entered for the following challenges:
Inkspirational Challenges - Anything Inkspirational Goes
Simon Says Stamp - Christmas

Thursday 17 October 2013

More Christmas Birds

Following on from yesterday's card, these cards use more elaborate patterned paper backgrounds that I felt didn't need any stamping.


Some Barn Door distress ink was sponged around the chest area of this bird to give it the feel of a Robin, and matching chipboard embellishments were fixed to both cards with a dab of Pinflair.


All these cards use patterned papers that came free with last year's card magazines.

Entered for the following challenges:
Crafty Little Fairies - Christmas in October

Wednesday 16 October 2013

Christmas Bird

Here's another Christmas card design using up patterned paper scraps. You don't always need to use Christmas diecuts on your cards.

"Christmas Bird"

This card uses a Sizzix bird die to make the Christmas bird by cutting the bird from Christmas patterned paper and recycled packaging, then sticking the two together giving a thick, chipboard type embellishment. Some Baker's twine is wrapped around the background before fixing to the front of the card to provide a "perch". The background paper is embossed, stamped and coloured with distress markers.

Come back tomorrow to see some more birdy Christmas cards using this design.

Entered for the following challenges:
Crafting Musketeers - Christmas in October
Christmas Cards all year round - Getting ready for Christmas
The Crafting Cafe - Anything Goes
Craft Room Challenge - Our Feathered Friends
Creative Craft Challenges 2 - Anything Goes
Deep Ocean Challenge - Christmas is Round The Corner

Tuesday 8 October 2013

Tuesday Technique - a Patchwork Background

This last month amongst other things I've been busy making Christmas cards for our local hospice. I've come up with a few money saving tips, and thought it would be fun to share this one with you.


Here in the UK, we often get 6" x 6" (15cm x 15cm) paper pads free with magazines, but the most common size of cheap card blank is A6 (approx 6" x 4" or 15cm x 10cm). So, you cut the paper down to size to mat and layer onto the front of your card and what do you do with all the patterned paper strips left over? Here's an idea...

1. 6" x 6" (14.8cm x 14.8cm) patterned paper.
 
2. Cut into two pieces 6" x 4" (14.8cm x 10cm) and 6" x 2" (14.8cm x 5cm)
 
3. Cut the smaller piece in half to make 2 pieces 3" x 2" (7.4cm x 5cm)

4. Once you have a pile of these offcuts, choose 4 whose colours match.
 
5. Add a thin smear of PVA glue to the reverse of one of the 4 offcuts.

6. Stick to the corner of a sheet of thin copy paper.

7. Apply PVA to the reverse of another offcut then adhere to the copy paper, butting the edge right up against the first piece and leaving a straight edge along the top.

 8. Add the third offcut as shown, placing the bottom right corner carefully at the join of the first two pieces.
 
9. Stick the last one in place. The fourth offcut fits into the gap perfectly!

10. Remove the excess copy paper with a guillotine.

11. Trim the edges neatly with a guillotine and cut to size to fit the front of an A6 card blank.

12. Ink the edges sparingly with distress ink using a piece of cut 'n' dry foam.

13. Add faux stitching with the fine point of a distress marker.
N.B. If the paper colours are dark, I often lighten them with some white stamped snowflakes and make the stitching with a white Inkssentials pen.

14. Finally, adhere to the front of a card blank, add some stamping and a diecut and you're done.
I'll be sharing lots more of my Christmas cards with you over the next few weeks so hope to see you again soon. Maddy x

Entered for the following challenge:
Lawnscaping - Patterned Paper Craze
Ladybug Crafts - Pierce, Sew or Inky Stitch